In order to annotate or transcribe a sound-object, a TextGrid-object has to be created. The particularity of a TextGrid-object is that underneath the spectrogram, tiers can be added. Every tier represents an independent level of annotation. Tiers can be added for every feature the researcher wants to annotate. For example, there can be a first tier for the orthographic representation of the sound. Figure 3 shows a TextGrid-object of the sentence Give her the post. In the first tier underneath the spectrogram, every word of the sentence and its boundaries are annotated. The second tier shows the boundary of each phoneme, while a distinction between vowel and consonant is made.
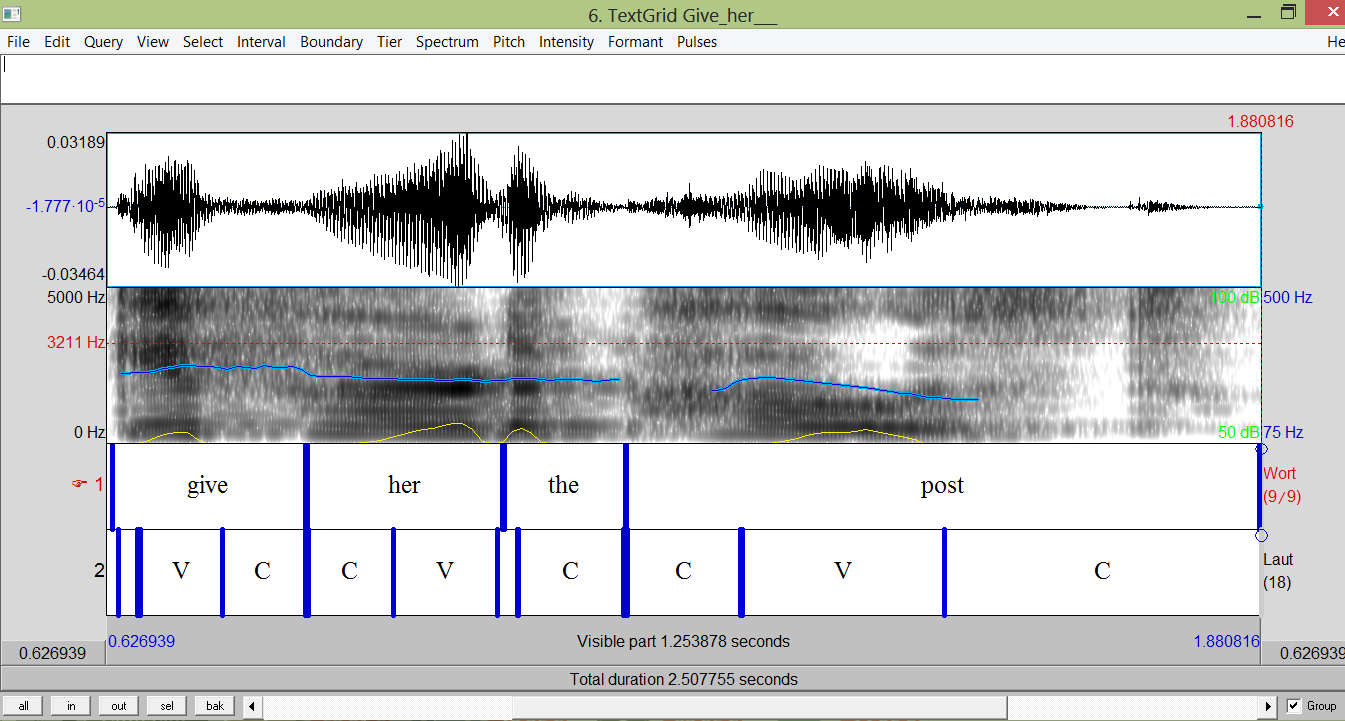
Figure 3: Screenshot from Praat/TextGrid-Object: Give her the post
Tiers may also be used in order to annotate boundaries of syllables or to distinguish between stressed and unstressed syllables. One might for instance distinguish between 1, which stands for stressed, and 2, which stands for unstressed syllable.
All of these mentioned possible ways of using a tier are typical examples of an interval tier. Interval tiers are used for annotations of broad occurrences with a starting and end point. Therefore, especially syllables or segments are annotated with an interval tier. Point tiers, on the other hand, are useful to annotate selective occurrences, for example the central point of a vowel or pitch accents (Mayer).
But how can such a TextGrid-object be created? First of all, select a sound in the object window. Subsequently, click on Annotate on the right hand side of the object window and finally To Text Grid. In order to choose the number and name of the tiers, feed the name of every tier into the first line called All tier names. By entering blanks between the words, the number of tiers is set. The second row should only be used if one of these tiers should be a point tier. Afterwards, press OK. Now, the TextGrid-file appears in the object window. In order to view and edit this object, click on both the sound and the TextGrid-file by using the control key. After that, click View & Edit and the TextGrid-Editor appears on the screen.
The starting and the end point, that means the boundaries, define the interval. In order to insert boundaries, click in the waveform at the preferred starting point. In the waveform, a red dotted line appears, while green lines appear in the tiers, the so-called boundary candidates. Now in order to insert an interval, drag the cursor from the starting point to the end point. Then choose Interval in the top row of the Text-Grid window and finally select Add interval on tier 1. An alternative is inserting boundaries. To do this, press Boundary in the top row of the Text-Grid window and then Add boundary on tier 1. Another alternative that can be carried out very easily is to select the interval with the cursor in the waveform and then press the Enter key. The fourth alternative is to click into the little circle at the green line of a boundary candidate, and the green line will change into a red one.
Finally, to insert the orthographic information, click into the preferred interval and enter the information. If the words of a recorded sentence are to be inserted and there is a pause in between, this pause can for instance be transcribed with <P>. But every researcher might, of course, use his or her own transcription scheme. After successfully annotating the TextGrid-object, save the object by clicking on File in the menu bar and then on Save TextGrid as text file.
Created with the Personal Edition of HelpNDoc: Full-featured multi-format Help generator